Pages

Showing posts with label ASANA. Show all posts

Tuesday, February 28, 2012

Case Study - Tight Hamstrings

Tight hamstrings are the number one issue all you broga dudes ask about, so I am super excited to present this post. As well as preventing you from performing at your best, and in extreme cases leaving you at risk for tearing (my god, OUCH!) the main problem caused by tight hamstrings is actually in our backs. Tight hamstrings can cause the hips and pelvis to rotate, or pull the pelvis out of our normal alignment, flattening the back and causing back problems and/or postural issues.


Some hamstrings. Not modelled by DC. Image courtesy Physio Advisor.

And, as you will know from previous posts of me harping on about this: healthy spine = healthy body! SO THIS SCOURGE MUST END!!!

By stretching out the hamstrings on the regular, they will become more and more flexible and less tight, which means as well as preventing the above problems from occurring, eventually you will be able to move further into your yoga postures and impress allll the ladies (Well, by ladies I mean me. And not so much impressed as "proud of your progress". But still)

**Update! I just spoke to a brogi who once suffered from lower back issues about this post, and he told me that after six months of daily hamstring exercises like the ones below, not only can he move about a foot closer to touching his toes (Go Brogi!) but also that he is no longer bothered by pain in the lower back! Amazing!**

SUPTA DANDASANA - with hamstring slide

Born to Slide

Sit sideways to the wall, with your butt up against the wall, and swing your legs so that they are up above your head, creating an "L" shape with your legs up the wall. Keep a bend in your knees until your spine in correctly aligned along the floor - to do this wiggle your butt so it is right up at the wall and use your core to secure your lower back firmly into the floor - removing any arching that may occur. Anchor your shoulder into the floor.

When you are in position, with your arms resting by your sides, exhale and slide your right leg from the bent position to straight up against the wall, with your foot flexed back and toes pointing at your head. Push up through the back of the heel. Inhale and slide the left leg up to straight, bending the right. Continue with the breath.

DC enjoying a hard earned "rest"

When you have done this for ten breaths per leg (or longer if you like! Go crazy!) you can hold the stretch and "rest" with both legs up the wall. Keep pressing your lower back, butt and shoulders into the floor, and try to get the backs of your knees to touch the wall, eliminating all of the space behind them. Also continue flexing the toes to the face, pushing through the heels. Relax and slow your breath, holding this pose for as long as feels comfortable (or maybe a bit beyond that, considering many will want to cry after one second... opps, I mean, you might get "sweat in your eyes")

Inhale to slide your legs sideways back down the wall, then roll back to the middle, resting (for reals this time I promise) with your back on the floor and your knees pulled into your chest.

Eventually can also do this exercise without the support of the wall, like this.

SUPTA PADANGUSTHASANA(Reclining Big Toe Pose)

You will need a yoga belt for this one, and by yoga belt I mean something you have improvised using a rolled up cotton scarf or any kind of strong belt like material. DC used his girlfriend Meg's scarf (Sorry Meg. It was definitely his idea, I swear)

Snitching aside, let's get into it. Lying on your back, with your knees bent and pelvis tilted to remove any arching occuring in the lower back, inhale and bring your right knee into the chest, looping your belt behind the foot. On the exhale, breathe out fully and begin raising your leg straight up to 90 degrees. Keep the left leg bent as much as you need to allow this to occur.
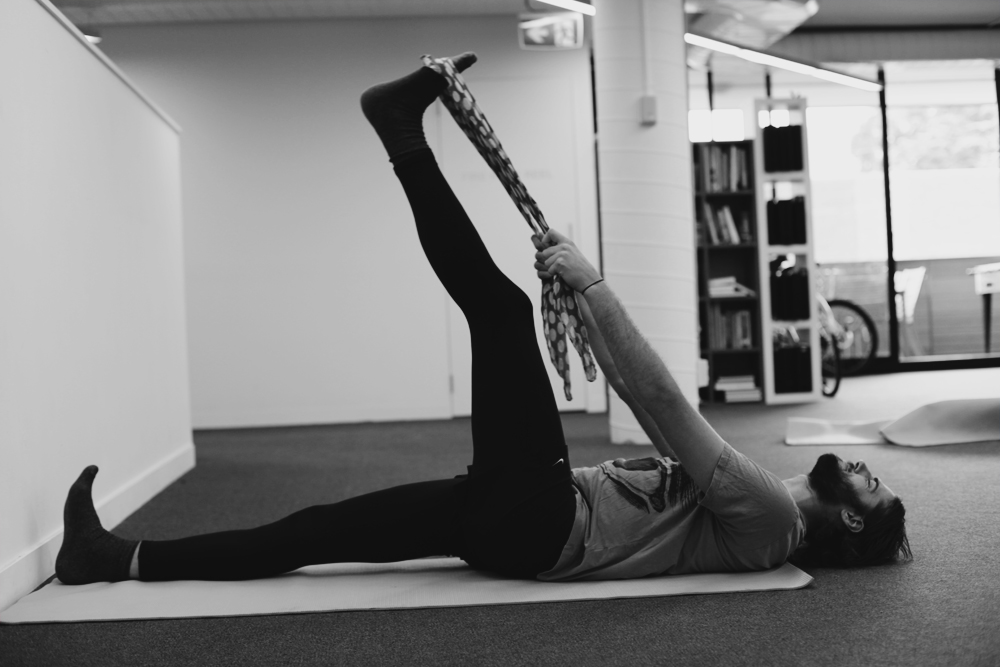
No scarves were injured during the making of this blog. Or DCs.

Keep your shoulders grounded into the floor, and continue bending out the back of your knee to as straight as possible, flexing the toes back down towards the face as we did before - extend up through the back of the heel. Once you have the leg as straight as possible in the air, try lengthening out the bottom leg along the floor more, getting rid of the bend. However, the second your back starts to arch, or you begin to lose the integrity of the straight leg, return the leg to the bended position in which this does not occur. Keeping the extended leg straight in air the main purpose of the exercise, not getting your damn leg straight against the floor :)

After holding for 1-3 minutes, slowly release on the exhale, and repeat on the other leg.

PASCHIMOTTANASA- Seated Forward Bend

Sit on your mat with feet together and legs bent, with your belt looped over your feet. Inhale to lift up out of the pelvis, bringing your spine straight. Be careful not to overemphasise this and balloon out your chest, tuck your chest to ribs if you feel the happening. Roll your shoulders down away away from your ears bringing your shoulder blades together behind your back so you are not hunching either.

Nary a hunch nor a balloon to be seen! A++

Then, on the exhale, begin bringing your torso down closer to your thighs, hinging forward from the hips. Notice I said hinging forward from the hips NOT hunching forward from the shoulders! Continuing to bring your shoulder blades together behind your back should alleviate this common error. You are trying to get your torso closer to your thighs, not your shoulders closer to your feet. Gaze straight ahead.


Once you have your torso on your thighs, experiment with bringing your thighs down towards straight along the floor. Go as far as feels comfortable but do not force this. Patience (and practice!) grasshopper. Eventually you will be able to lose the belt and use your hands behind your feet to pull you into the pose. See: Paschimottanasana.

No matter where you are in the pose, use your inhale to pull your spine out from the pelvis making it longer and straighter; and your exhale to pull you further down towards your thighs. Lengthen, compress, lengthen, compress.

Try holding here for ten breaths, but come out if you feel any pain, or you begin slumping into the lower back.

UTTANASANA(Standing Forward Bend)

Starting in our trusty "fierce pose" position, take a breath in the bring the arms up and torso as straight as possible, gazing up between the hands.


Then on the exhale, "hinge" forward at the hips to bring your torso down onto the front of your thighs. Bend your knees as much or as little as possible as you need to achieve this. Some people will be able to do this with straight legs, others very bent. It Does. Not. Matter!


When you are here, soften the belly against the thighs and make sure your shoulder are relaxed, with your shoulder blades pulling down the back away from your ears. You do not want your shoulders tensing up around the neck. From this position practice trying to straighten one leg - exhale straighten, inhale return - then the other. Try to manage abut ten "straightens" per leg.

If you are able to straighten both then use your breaths to tilt the pelvis and bring your body even closer to the thighs, and head closer to the floor. Inhale - lift and lengthen the torso out from the hips, exhale - release more fully into the forward bend, letting your head hang. You can wrap your arms around your calves to assist you with this - but no forcing. Use your core to scoop up the belly, making it disappear up into your ribcage, helping you go deeper into the pose. Breathe!

Keep practicing and you will look like this. Yay!

When your are ready, bring your hands onto your hips, and lengthen the torso, hinging from the hips to bring your torso to standing on the inhalation.

Hope these all help, my tight hamstrung friends. Relax in between exercises by sitting with your feet out in front of you and shaking them out.

Bromaste!

Tuesday, February 14, 2012

Pose of the Week: Tadasana


When you first see this pose you may think "that's just standing, I can do that!" But when you do it correctly, paying attention to all the parts of your body, you will soon learn that it is not so simple after all! Tadasana (Mountain Pose) may look like "just" standing, but is actually a very powerful and useful exercise in itself. Just like yoga may look like just doing stretches but is actually SUPER AMAZING and will change your life... okay I'll stop now raving now :)

So Tadasana:


FEET: First things first, traditionally you can stand with feet together but for beginners I recommend feet hip-width apart, just for extra stability. Rock back and forth on your heels/ balls of feet, then settle into the middle ground. Pull up your arches and put your weight so it rests on the outside edges of your feet.

LEGS: Pull "up" in your thighs so you feel your kneecaps rise up your legs and your legs becoming strong and "switched on". Get your buttocks in on the action by clenching them slightly to help bring your pelvis into alignment. Which brings me to...

PELVIS AND HIPS: Practice tilting your hips so your pelvis tilts up and then down, then rest in the middle in correct alignment. To check this, make a triangle with your hands and place it so the palms of your hands rest on your hip bones. When your pelvis is in the right place the thumbs and fingers should be lined up - not one further forward than the other. See:


CORE: Use your core strength to hold your pelvis in alignment - exhale and switch on your core by expelling ALL the air in your belly pulling your navel in towards your spine.

BACK: You want to get rid of any unnecessary (and potentially trouble causing) curvature in your spine. Getting the pelvis into the correct alignment will greatly assist with this, as will "tucking" your ribs in so they get closer to your hip bones.

A good way to practice this is to practice Tadasana against a wall. Start with the feet about three inches away form the wall, then with the butt and tops of the shoulders both resting on the wall see how far you can get your arm through behind your back. Your hand should be able to just get your fingers past the spine - but no further. Tilt your pelvis until this is achieved, and switch on the core to support your back in place. Then practice walking around like this! You may feel stupid but it is a great way to practice and get the feeling of having correct spinal alignment.

Eventually your core will come to the party and start supporting your spine in it's correct position 24/7! Then you will have amazing spinal alignment, not suffer lower back problems and live happily ever after*, amen.

* okay, maybe not this bit... but it will help :)

SHOULDERS/ ARMS: Press your shoulder blades together behind your back, then widen them across and release them down your back. Roll them up and down a few times, then release your arms by your side. Make your arms strong by pointing all fingers towards the floor.

HEAD: Balance the top of your head directly over the center of your pelvis, with the underside of your chin parallel to the floor. Imagine a string is running from the top of your head to the ceiling, pulling your whole body up as tall as can be.

Inhale into the chest and exhale from the belly, enjoying the feeling of correct postural alignment, as well as the stability and strength of the pose. Tadasana is a calming pose, designed to give the feeling of being grounded and supported by the earth. In this busy world especially it is easy to feel like we live up in our head, lost in the many thoughts that float around us. It's nice to enjoy the support of the solid earth beneath us. Let your breath calm you and remember this constant support - even when you feel unsupported in the world the earth always has your back! Thanks earth :)

Bromaste!

PS. Click to view this image with instructions here on the new Broga flikr group!


Monday, February 6, 2012

Pose of the Week... Fierce Pose (ROAR!)


Utkatasana ("fierce" or "chair" pose) is a great pose for strengthening your core, quads and glutes (aka your butt) and as part of the Sun Salutations series it is a foundational yoga pose you will come across again and again. The idea is to actually pretend to sit back in an imaginary chair - so it comes with an in-built visualisation to help you out!

So... how to:

Starting in Mountain pose, inhale and lift your arms above your head, lengthening your spine.

Exhale and bend your knees, moving your body into a 45° angle. Make sure your back stays straight and that there is not a groove in the small of your lower back with your butt sticking out! Tuck your pelvis and engage your abs by bringing your naval towards your spine to assist with getting your back in a nice straight line. Let your upper body sink into pelvis and try and bring your thighs so they are parallel to the floor (this may take time!) 

DC is loving this pose! 

Keep your weight back into your heels - try wiggling your toes to make sure you are shifting the weight to the back of your feet, and breathe deeply here for a few rounds. Inhale - return to Tadasana.

*Note: you can have your feet together or hip width apart, depending on which feels more stable for you :)

There you go... Fierce Pose!

Now here are some series you can add on from your Fierce Pose...

Fierce Twist:

"Please lord, let the next pose be easier"

From your fierce pose, inhale and lengthen the spine, then on the exhale bring your hands together and hook your left elbow on your right knee (or in the general vicinity of the knee, DC STYLE!)

Press your hands together and use this action to roll your shoulders open and gaze up to the ceiling. Breathe deeply and twist further into the pose on each exhale. After a few rounds of breath, return to fierce pose and repeat on the other side.

Sadie Nardini demonstrates this pose as one of "Three Yoga Moves to Boost Immunity" here.

Breath of Fire:

Starting in Fierce Pose take a big inhale and open your chest as much as possible, opening your arms wide behind you and bringing your shoulder blades together at the back. 

Hug it out DC!

Then, on the exhale, cross your arms over yourself and round through the shoulder blades and back, bringing your arms in as if to give yourself a nice big hug (HIPPIE ALERT) Feel your shoulder blades really opening up at and pulling apart as you gaze into your chest.

Inhale, open the arms back out, and continue alternating between the two with your breath. Make sure to make the breath as long as possible, and exhale all the air on that exhale (/hug)

Repeat ten times, or less if your thighs really are beginning to burn! If this is too much come out of fierce pose slightly. If you want the chest opening action but not the thigh burn you can even do this from a kneeling position.

Sadie Nardini demonstrates this "Calorie Torching" (woo!) move in this video - skip to 7:11.

As an aspiring hippie it would also be remiss of me not to point out that this exercise is excellent for opening your heart chakra... oh yeah I used the "C WORD" on this blog! Suck it up, bishes! Read more about why you would want to do this here. Or don't :)

One more... if anyone is still reading now... 

Fierce Lion Pose:

I like this one as it combines my love of dynamic poses and making overdramatic yoga noises!

DC releases all the tension of being a world renowned Broga model

From Fierce Pose inhale fully and then make a huge sighing exhale, swooping your arms down and behind you in a huge "whoosh" (technical yoga term) Make some noise - a giant "HA" sound is best here. If your neighbors don't think you are a weirdo you are doing this wrong! The idea is to get all the tension out from your body, so if anything is pissing you off now is your chance to HA that all out. Rise on the inhale, then repeat. I'd say do this at least six times, more if you're having a bad day :)

Again Sadie Nardini demonstrates this excellently here. Fierce Lion Pose kicks in at about the 1:40 mark. Complete with "HA"s.

Hope you enjoyed these immunity boosting, calorie torching, chakra opening, tension releasing moves!  

Bromaste!